





register for newsletter
get latest company news
+86 13113657186



Gang sheet printing is a common production method in Direct-to-Film (DTF) printing. It allows multiple designs to be arranged on a single roll or sheet of PET film, making it possible to print different graphics in one production run.
However, the number of designs placed on a gang sheet does not necessarily reflect how efficiently the film is being used. Poor artwork preparation, excessive spacing, unsuitable layout arrangements, and unused areas can increase material consumption and production costs.
Optimizing gang sheet layouts helps businesses make better use of available printing space, reduce material waste, and improve overall production efficiency.
What Is DTF gang sheet layout Optimization?
A DTF gang sheet combines multiple individual designs into one printable layout. Instead of printing each graphic separately, operators arrange several designs within the available film width and length.
The main objective is to use the printable area efficiently while maintaining sufficient spacing between designs for cutting, handling, and heat transfer.
Film utilization can be evaluated using a simple formula:
Film Utilization Rate = Design Area ÷ Total Film Area × 100%
For example, if a gang sheet has a total area of 1,000 square inches and the actual design areas occupy 750 square inches, the utilization rate is 75%.
However, the remaining space is not always avoidable waste. Irregular artwork shapes, cutting requirements, printer limitations, and minimum spacing can all affect how much of the film can be used.
Common Reasons for Low Film Utilization
Several artwork preparation and layout habits can reduce the effective use of dtf film.
Excessive Canvas Margins
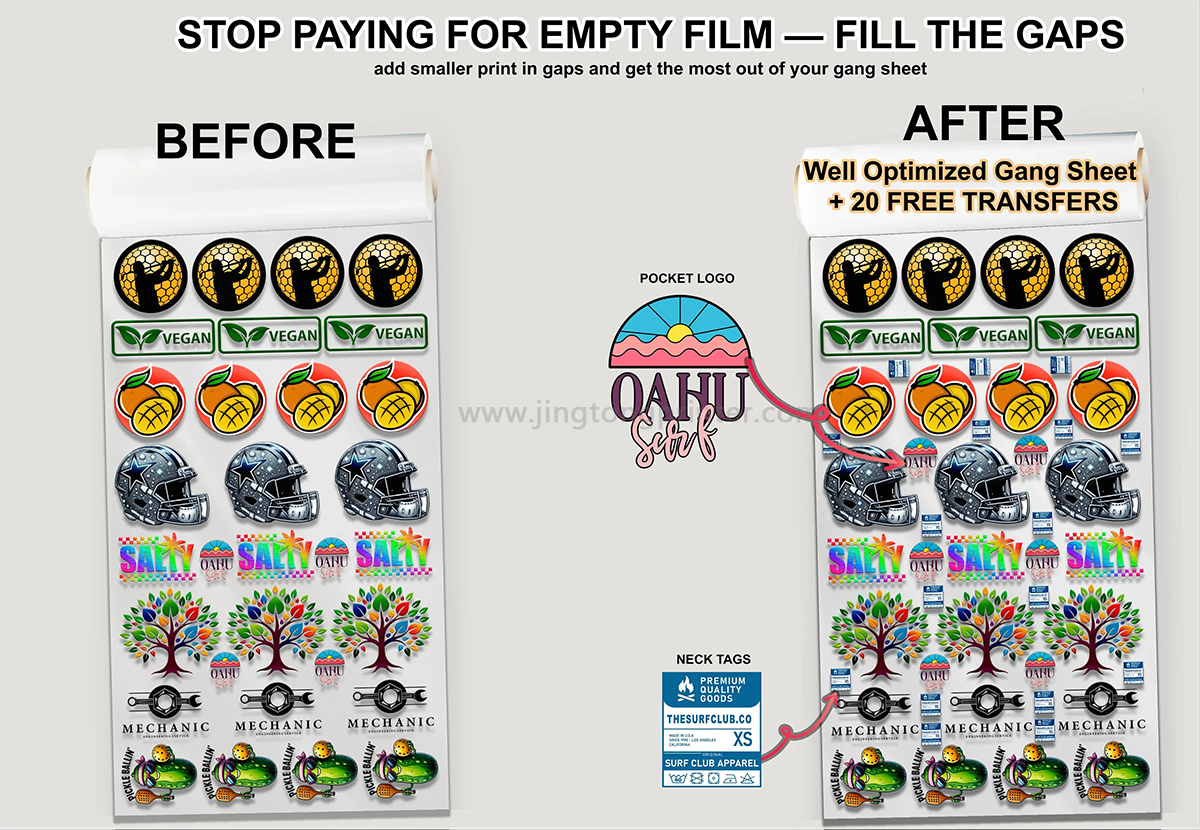
An artwork file may contain large transparent margins around the actual design. Although these areas are invisible when viewed on screen, they can affect automatic layout calculations if the software uses the full image dimensions.
For example, a logo that visually measures 4 inches wide may occupy a larger file area because of unnecessary transparent padding.
Cropping artwork closely to its actual boundaries helps reduce unnecessary spacing and makes layout arrangement more efficient. A reasonable margin should still be maintained when required for cutting or handling.
Fixed Artwork Orientation
Some designs are more efficiently arranged when rotated. A tall, narrow graphic may fit beside a horizontal design if its orientation is adjusted.
When rotation is allowed, the layout software can explore more placement possibilities and potentially reduce unused areas.
However, not every design should be rotated. Text, directional graphics, and certain logos must retain their original orientation. Rotation settings should therefore be controlled according to the artwork requirements.
Mixing Designs with Very Different Dimensions
Combining large graphics with many small logos can create irregular gaps that are difficult to fill.
Grouping designs with similar dimensions can simplify layout planning and improve space utilization. However, this is not a universal rule: mixing different sizes can sometimes produce better results when their shapes complement each other.
The most efficient arrangement depends on the actual dimensions and outlines of the designs rather than size categories alone.
Excessive Spacing Between Designs
Large gaps between individual graphics consume additional film without increasing the number of usable transfers.
Spacing should be sufficient for cutting, peeling, and handling, but unnecessarily wide gaps should be avoided. The required distance depends on the cutting method, design complexity, and production workflow.
Automatic and Manual Gang Sheet Layout
Automatic layout software can arrange multiple designs within a defined printing area. It is useful for handling large numbers of graphics and reducing the time required for manual positioning.
Depending on the software, automatic nesting may consider image dimensions, rotation, spacing, and printable width. However, some systems arrange designs according to rectangular image boundaries rather than their actual visible outlines, which can leave unused spaces between irregular shapes.
Manual layout provides more control over individual design positions. Operators can arrange graphics according to their actual contours and place smaller designs in suitable gaps between larger ones.
For recurring production jobs, a combination of automatic and manual arrangement can be practical. Automatic tools handle the initial layout, while manual adjustments improve the use of remaining space.
Making Better Use of Remaining Film Space
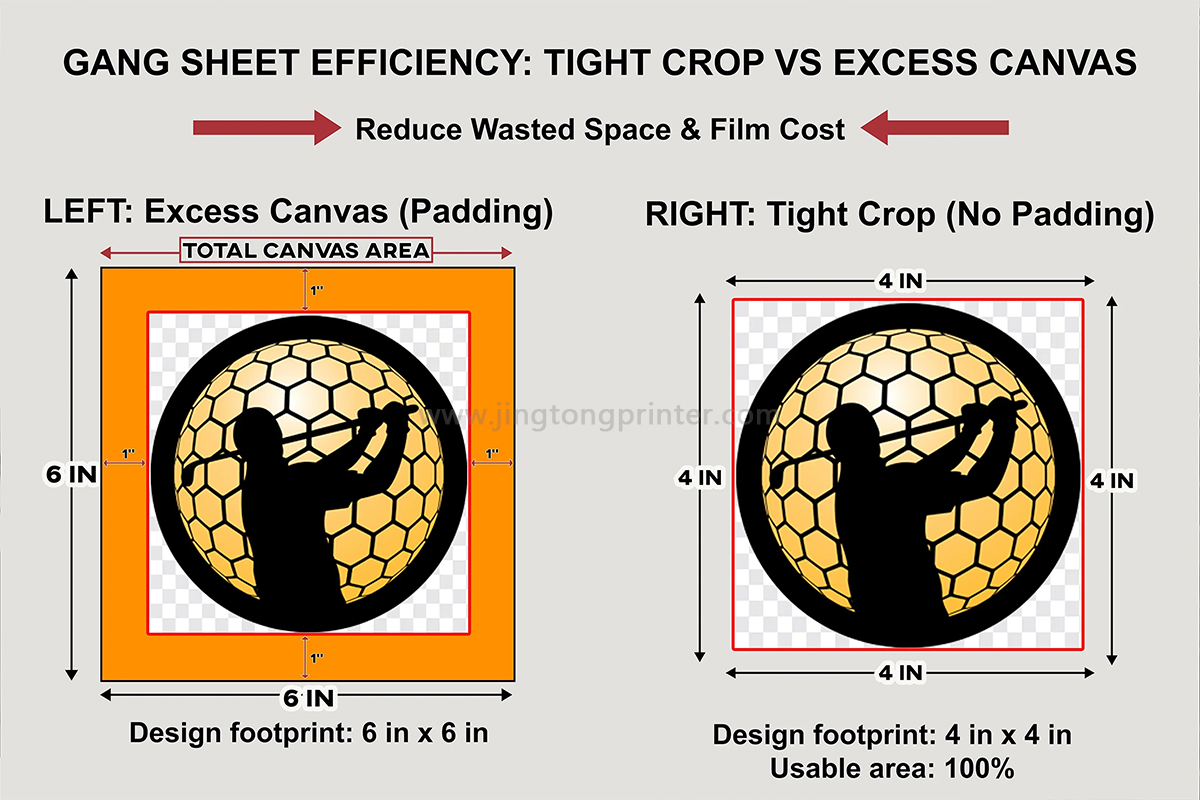
Small unused areas do not always need to remain empty. They may accommodate additional designs that are regularly required in production.
For example, businesses producing custom apparel can consider adding small logos, sleeve graphics, pocket designs, or garment labels when sufficient space is available.
This approach is especially useful for businesses handling repeat orders or maintaining a collection of frequently used designs.
However, additional graphics should only be included when they are likely to be used. Printing unnecessary transfers simply to fill the film can create excess inventory and additional handling work rather than genuine cost savings.
Practical Tips for Improving Gang Sheet Efficiency
A consistent layout preparation process can help reduce material waste:
● Crop artwork to remove unnecessary transparent margins.
● Confirm the actual print dimensions of every design.
● Allow rotation for graphics that do not have fixed orientation requirements.
● Maintain suitable spacing for cutting and transfer handling.
● Arrange designs according to their actual shapes, not just rectangular file boundaries.
● Use automatic nesting as a starting point and manually adjust inefficient areas when necessary.
● Fill suitable remaining spaces with small designs needed for future production.
● Review completed layouts before printing to identify unnecessary gaps and incorrect dimensions.
It is also useful to compare the total film area with the actual design area across several production jobs. Tracking utilization rates over time helps identify recurring layout problems and evaluate whether adjustments are improving material efficiency.
Conclusion
Efficient DTF gang sheet layout is an important part of controlling material consumption and production costs. Excessive transparent margins, fixed artwork orientation, unsuitable design arrangements, and unnecessary spacing can all reduce PET film utilization.
By preparing artwork carefully, using appropriate nesting methods, and making practical use of remaining space, operators can fit more usable designs into each printing area.
The goal is not simply to achieve the highest possible utilization percentage. A good gang sheet layout should balance film efficiency with cutting requirements, design integrity, workflow convenience, and actual production demand.
get latest company news
Scan To Wechat